
TM 5-3820-233-12/2
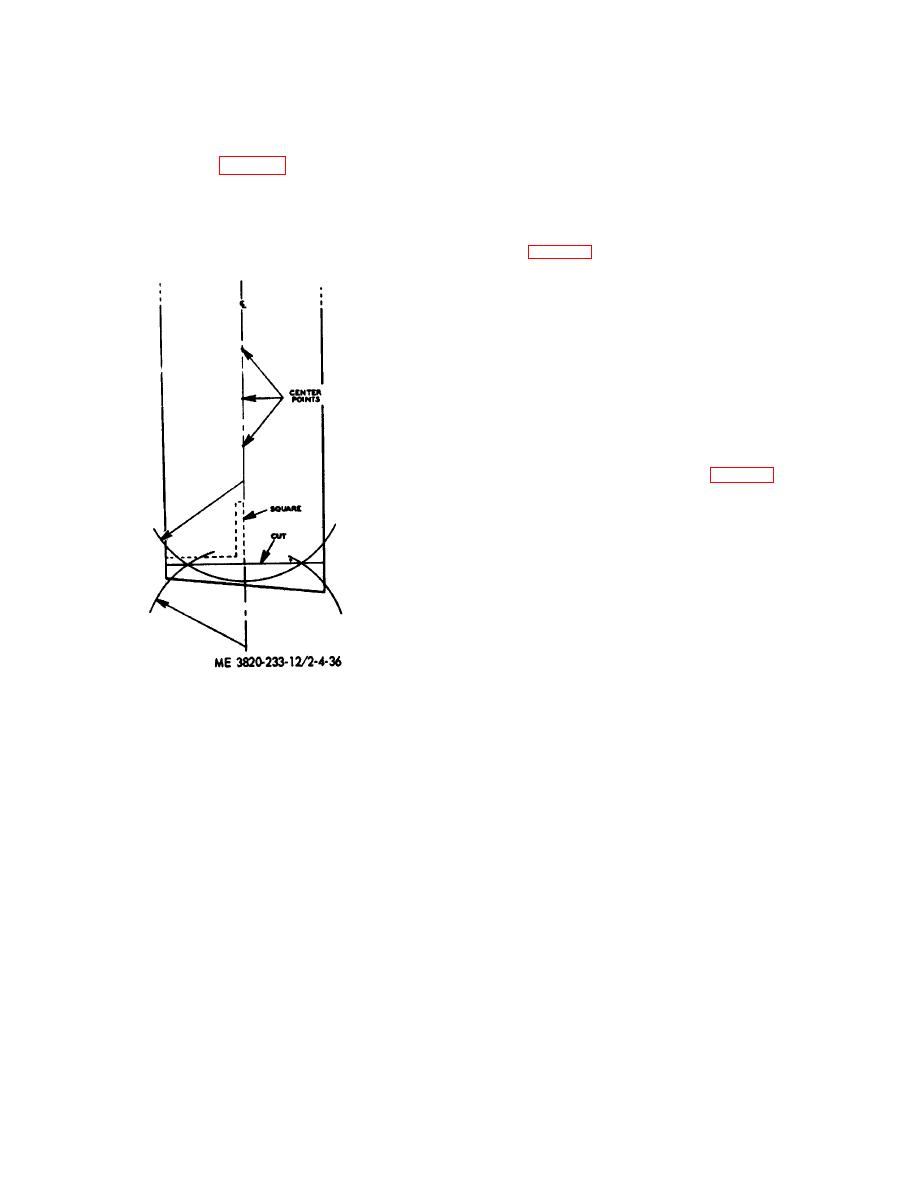
b. Belt Cutting. Molded edges on new belts are not
(4) Assemble stretcher clamp on end of belt
before belt is pulled onto conveyor completely. This will
always straight. It is recommended to square ends of
prevent loose end of belt from traveling up the conveyor
belts with center line of the belt as follows:
and off the head pulley. Attach clamp holding device feet
(1) At intervals of three to five feet mark center
front belt end to permit squaring of belt.
points on belt for 15 feet (fig, 4-36).
(5) Move belt onto the conveyor until squared
(2) Draw an average center line with these points
end is in position where belt will be spliced.
as guides. Pick a point on center line of belt and swing
(6) Install wood belt stretcher clamp on belt 18
an arc through markings to determine cutting for
inches from end of belt, tie assembled clamp to conveyor
squaring belt end.
frame (fig. 4-37).
(3) Using a steel straight edge intersect these
(7) With attached cable pull belt over the top of
two points and cut belt on this line.
squared belt end until correct tension is obtained. Hold
this tension, find center line and mark where belt must
later be cut.
(8) Assemble second belt stretcher clamp 18
inches from belt end and install belt stretcher rods
between clamps tightening nuts until pressure is relieved
from pull cable.
(9) Insert a plank under the belt and cut to
correct length at previously marked line. Using template,
punch holes in both ends of the belt for fasteners.
(10) Wrap belt tape over splice and completely
around belt, then install fasteners (fig. 4-38) as follows:
NOTE
Always use proper size fasteners and correct
belt template to correspond with belt width.
(a) Square belt ends and cut to length.
(b) Support belt with plank and nail template
in position with belt ends tight against lugs.
(c) Punch or bore holes and assemble bolts
in bottom plate. Install belt tape on underside and top
side of belt between belt plate and belt. Insert bolts from
under side along one row of holes.
(d) Place template across end of belt with
bolts in notches and position other end of belt over bolts.
(e) Press belt onto bolts and remove
Figure 4-36. Conveyor belt cutting.
template. Press belt firmly into place.
(f) Place top plate over one bolt and insert
c. Belt Installation. The conveyor belt is cut to
bolt horn assembly tool in other hole to pry second bolt in
approximate correct length at the factory with ample
place. Assemble all top plates in the manner and run
length to permit squaring both ends at assembly.
nuts down by hand.
(1) Uncrate belt and insert bar through center for
(g) Check that plates seat squarely on belt
lifting and threading belt on frame. Check belt to be sure
and tighten nuts.
thickest rubber covering is on the load side.
(h) Hammer plates in belt with metal or hard
(2) Before installing belt be sure adjustable head
wood block as illustrated, and retighten nuts.
pulley is in its shortest position.
(i) Break off bolt ends with bolt breaker. On
(3) Pull belt into position. For convenience in
belts with thick rubber covers, retighten all nuts after a
splicing, ends should come together on top run of
few hours running. Correct application of belt fasteners
conveyor near the tail pulley. If necessary remove
will distribute the strain evenly over the whole plate.
troughing rolls to provide ample room for splicing.
4-32
