
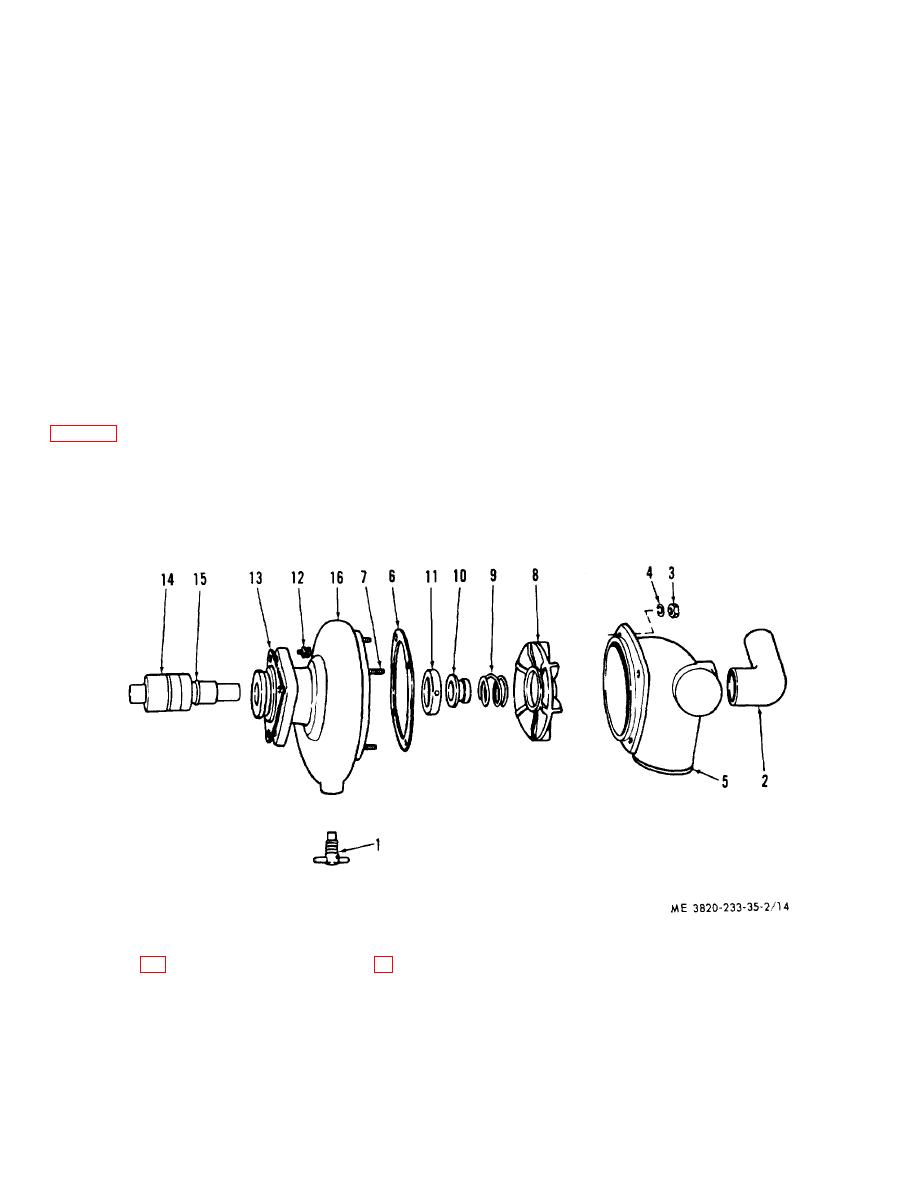
TM 5-3820-233-35/2
installing new insert. Press insert in until it contacts the
d.
Cleaning, Inspection, and Repair
shoulder in pump body.
(1) Clean all parts with an approved
cleaning solvent.
Note
Caution
Do not mar the seal contact surface
Do not immerse pump shaft
of the insert when pressing it into
assembly in cleaning solvent. Dirt
the pump body.
may be washed into sealed shaft
(2) Install Slinger on the pump shaft
bearing and cannot be entirely
assembly with the flange of the slinger approximately
removed.
3/16 inch from end of the outer race of the shaft
assembly bearing.
(2) Inspect pump body, pump shaft, seals
(3) Place impeller end of pump body on
and impeller for cracks, scoring, wear, or other damage.
an arbor press, and insert slinger end of pump shaft into
Replace defective parts as necessary.
'pump body. Press against the outer race of pump shaft
(3) Inspect studs in pump body. Replace
bearing until bearing touches the shoulder in the pump
studs if necessary, and torque to 10-12 foot pounds.
body.
(4) Clean surface of pump seal, and
e
Reassembly. Reassemble the water pump
apply a thin coat of liquid soap on inside surface of seal.
in the reverse numerical sequence as illustrated on
Slide seal onto pump shaft until it is seated firmly
against the pump body insert.
(5) Install pump seal spring with the small
(1) If steel insert is replaced, be sure the
end toward the seal.
counterbore in pump body is thoroughly cleaned before
1
Drainlock
7
Stud
13
Gasket
2
Connector
Impeller
14
Shaft assembly
3
Nut
9
Spring
15
Slinger
4
Lockwasher
10
Seal
16
Body assembly
5
Cover
11
Insert
6
Gasket
12
Bolt (with seal washer)
Figure 14. Water pump exploded view.
3-12
